change SQL server default Port 1433 to New
HOW TO CHANGE PORT OF SQL SERVER
SQL Server port modification tutorial
SQL Server port change tutorial
Modify SQL Server port number instructions.
Changing SQL Server default port easy steps
Step-by-step guide for SQL Server port change
Efficient SQL Server port adjustment process
Quick tutorial on altering SQL Server port.
SQL server port number check
SQL change port 1433.
how to change port number in SQL server management studio
SQL server port change
Table of Contents
Introduction:
Reason To Change SQL Server default port 1433.
Change SQL Server Port: In SQL Server database RDBMS use 1433 default port for communication. but it is risky for security reasons, you must have to change the default port to another new one port for secure and safe communication.
Sometimes you have multiple SQL servers in the same network that time you can have issue related to port conflicts in that case you have to change the port of SQL server to avoid conflicts.
Make sure that you need to allow new port (which you are giving to SQL server instead of 1433) in your firewall and network for proper communication.
To avoid unauthorized access using default port 1433 you must have to change the SQL server’s 1433 port.
In some cases, if you have multiple SQL server on your network and all are having same port as 1433 it is easy to connect your SQL instance from one SQL server.
if you are accessing live server from UAT server and unfortunately you have executed some script or changes in live database,
it is very risky for your business and applications, to avoid such things you must have to change SQL server default port 1433.
In this article we will learn process of changing default port (1433) for SQL Server.
Before you proceed:
Before making any changes, it is required to check the impacts on your running applications and services.
If you are changing the Default SQL port from Live database then you need to care about your running applications. to avoid application issues you have to try it on UAT environment first and then try on Production environment.
Before you Change the Default SQL port 1433, make sure to communicate with your clients and vendors because after changing the port you need to specify the same port in you SQL data source and db. connection properties file to run application successful.
Step by Step Guide to Change Default port 1433 of SQL server
HOW TO CHANGE PORT OF SQL SERVER | Change SQL Server Default Port 1433 To New (youtube.com)
Step 1: Check the current SQL Server port:
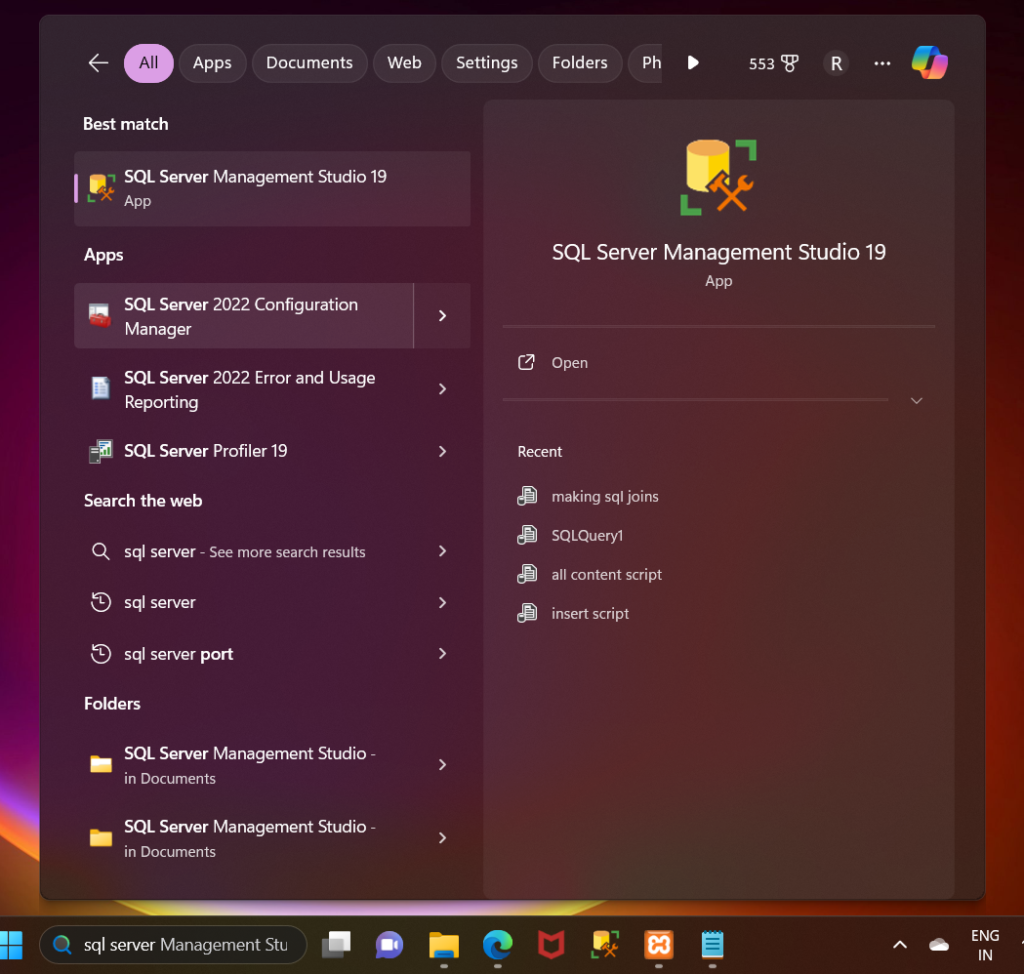
1.1 Open SQL Server Configuration Manager:
On Windows, type in search box type SQL Server Configuration Manager and open it.
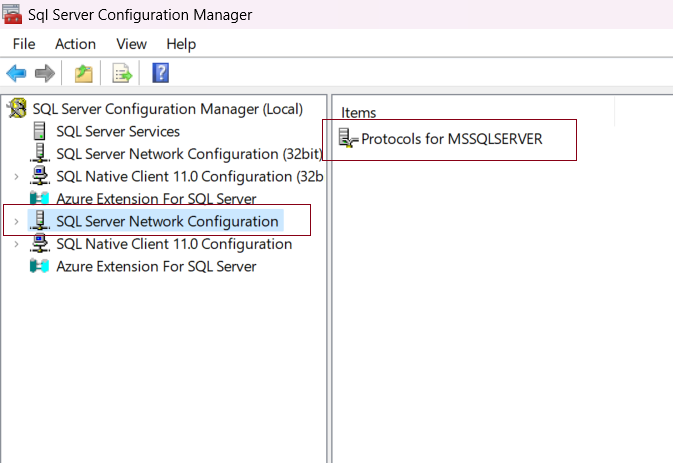
1.2 Navigate to the SQL Server Network Configuration:
In SQL Server Configuration Manager, expand “SQL Server Network Configuration” and
Click on “Protocols for. e.g. Protocols for MSSQLSERVER
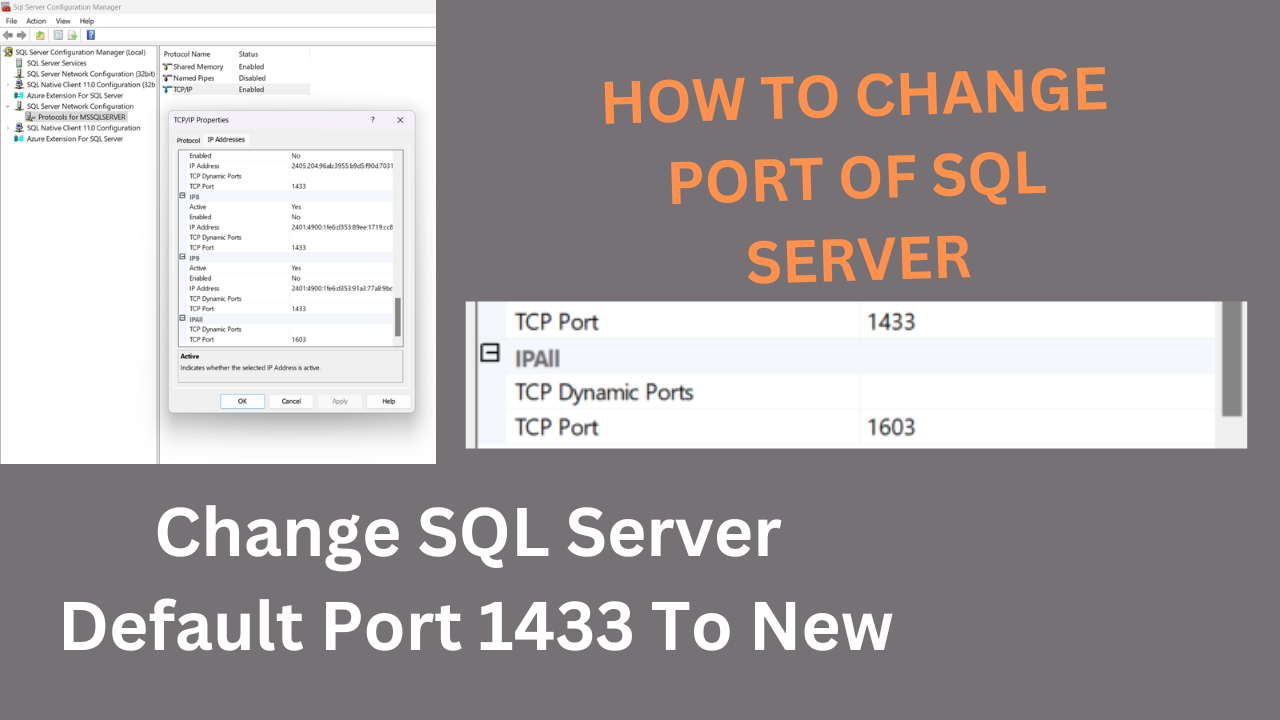
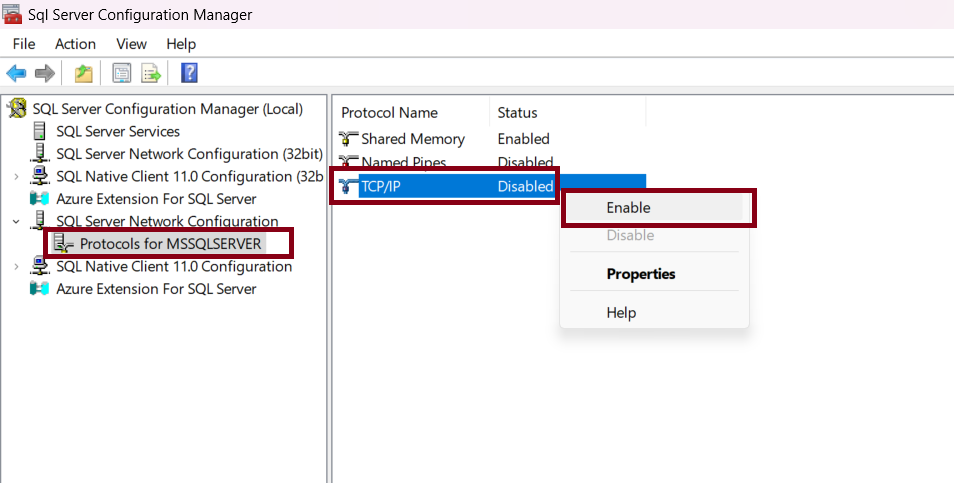
1.3 Check the TCP/IP properties:
If the “TCP/IP” Status is Disabled to Enable it right-click on “TCP/IP” and click Enable.
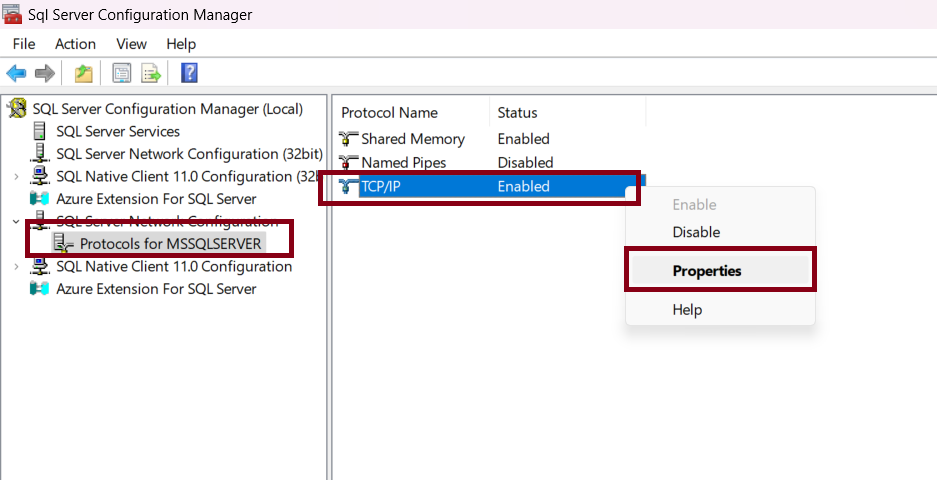
Right-click on “TCP/IP” option in the right side and choose the “Properties” option.
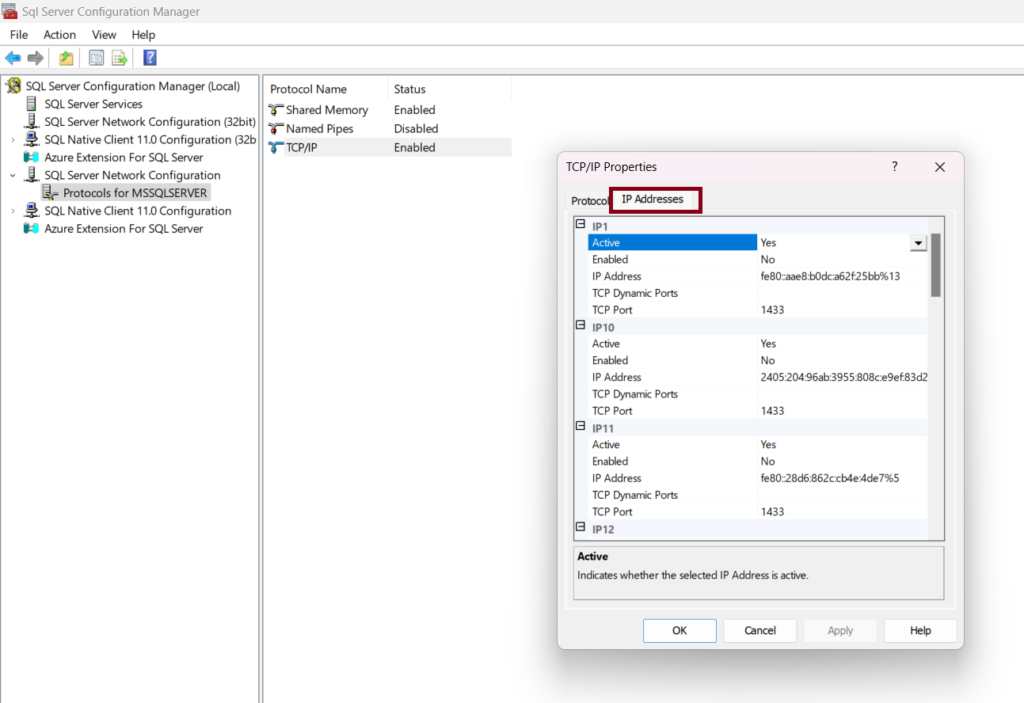
Here you will see Two options “Protocols” and “IP Addresses” Go to the Next Tab “IP Addresses” and check for the “TCP Port” value under the IPAll section @ last. (1433) This is the default current port number.
Step 2: Choose a new port:
2.1 Select an available and unused port for your SQL Server.
Make sure that your Port should be allowed in your Firewall and Windows firewall inbound and outbound rules.
Ensure the chosen port is not blocked by firewalls and is not in use by other applications on the server.
New Port which you are giving is not blocked by firewall otherwise it will not run, or applications will not.
Port should be Unique do not take a port which is already used by other applications on the server.
Repeat the same steps 1.1 to 1.3 to change SQL Port
Database Administration Archives – Developers Tutorial (itdevelopement.com)
Step 3: Configure SQL Server to use the new port:
3.1 Open SQL Server Configuration Manager:
In SQL Server Configuration Manager, expand “SQL Server Network Configuration” and
Click on “Protocols for. e.g. Protocols for MSSQLSERVER
3.2 Check the TCP/IP properties:
If the “TCP/IP” Status is Disabled To Enable it right click on “TCP/IP” and click Enable.
3.3 Change the TCP Port:
Right-click on “TCP/IP” in the right-side panel and select “Properties” option.
Here you will see Two options “Protocols” and “IP Addresses” Go to the Next Tab “IP Addresses” and Go to the “TCP Port” value under the IPAll section @ last
remove your current port and modify/update the Port with new port number ad click on Apply and OK button.
How to take database backup in SQL
3.4 Restart SQL Server:
After click on Apply you will see a popup “Any changes made will be saved, however they will not take effect until the SQL service is stopped and Restarted” ciick on Ok and Ok.
so after updating Port, restart the SQL Server service (SQL MSSQLSERVER) to apply the new configuration.
Step 4: Update Firewall Rules:
Ensure that the new port is allowed in the firewall to for proper communication with application and database.
Add the new port in the windows firewall settings to open the chosen port for both inbound and outbound traffic rules.
Make sure that choosen port is not blocked by firewalls and is not in use by other applications on the server.
Step 5: Verify the Configuration:
After changes in SQL Server port verify the connection. To verify use SSMS SQL Server Management Studio and connect to the SQL Server instance using the new port enter server name, port and enter username password to connect if login successful then your SQL server port is successfully changed.
Conclusion:
before you change the port, you must have to do planning and testing.
First do it on UAT environment and after you can plan the Port change activity in Production server,
when changing port in SQL server change your all SQL server database connections and all properties file from applications, inform your clients and vendor before changing port on live Database they will plan accordingly.
HOW TO CHANGE PORT OF SQL SERVER
FAQ
FAQ On Changing Default Port 1433 in SQL server
Q: Why would I want to change the port for SQL Server?
Ans: There are many reasons to change port in SQL server security reason, port conflicts running on same server, network requirement, modify default port etc.
Q: How can I change the port for SQL Server?
Ans: You can change the SQL port using SQL Server Configuration manager.
- Open SQL server Configuration Manager.
- Expand SQL Server Network Configuration and right click on your SQL server instance
- Click On Protocols for your SQL Instance
- Right Click on TCP-IP and select Properties
- Go to the IP Addresses Tab
- Go down @ IPall Section and and change TCP Port and click Apply and Ok
- Restart The SQL Service to save changes.
Q: Do I need to restart SQL Server after changing the port?
Ans: Yes, to make changes you must needs to restart the SQL service.
Q: How do I consider new port is accessible?
Ans: After changing Port to check connect your SQL server with your Server name, NewPort and connect.
Q: Are there any additional configurations needed after changing the port?
Ans: After changing the port you need to add new port in Windows firewall Inbound and Outbound TCP port, and if you have different firewall allow the new port in firewall configuration.
Q: Can I revert to the default port if needed?
Ans: Yes, follow the same steps to revert your old port and restart the SQL service.